A permanent paver installation requires a lot of work and resources – but if you’re only going to need your patio for one or two seasons, you can make a simple version of that installation. We’re going to teach you how to lay pavers on dirt and make one of those simple installations.
It is important to know that, while a simple quick installation can be done easily in some specific situations, it is still highly recommended that you do a complete paver installation as soon as possible.
Even from a DIY approach, you will still want to make things right so you don’t end up spending more money and time than necessary. So, in this article, let’s take the steps in how to simply install pavers on dirt.
Read as well: How much does it cost to clean and seal pavers in 2024?
Jump to:
How to lay pavers on dirt: materials and resources needed
First, let’s talk about the materials and tools you’re going to need.
Tools
- Work Gloves and Safety Glasses
- Measuring Tape
- Rake
- Shovel
- Hand Compactor
- Level
- Edge Restraints
- Rubber Mallet
Materials
- Pavers
- Stakes
- Twine
- 2×4 piece of wood
- Sand
The materials you’re going to need are not very different from what you would need for a full installation, actually. The difference is that you’re not spending on the excavation and bedding of the soil beneath the pavers.
How to lay pavers on dirt in 5 steps
Step 01: Remove Debris
The first step on how to lay pavers on dirt is to remove any debris on your working site. This debris consists of rocks, grass, or any other thing that is not actually dirt. In the end, you want to be able to see the ground in a more or less leveled and uniform way.
Step 02: Mark the Space
With the ground cleaned up, now is the time to delimitate your area of work. To do that, you’re going to hammer four stakes in the ground, one in each corner of your imaginary patio, that you’re going to measure using the measuring tape.
After that, tie the twine in one of the stakes, as close to the ground as possible, walk to the next stake, wrap the twine around it, and continue to do so until you have a “twine square” around the entire area.
Now you have an even clearer perception of the entire project and are ready to move to the next step.
Step 03: Leveling the Ground
A few considerations about leveling the ground. Ideally, you want your pavers to be leveled not only amongst themselves but also concerning the level of the entire area – as you can read in our full tutorial.
We are not going to lie, though: doing that without excavating the ground, at least a little, is difficult. Especially when you need to add sand on top of the dirt before laying the pavers.
So, from here on, you have two options. You either want your pavers to be leveled to the surrounding ground, or you don’t.
If you want them to be leveled, you will need to do some basic excavation to account for the thickness of the pavers plus the 1-inch layer of sand you need to add.
If you don’t care about the leveling, you can simply add the sand on the ground and be done with it.
In either case, you’re still going to need to level the sand. You can do this by using the level and the 2×4 piece of wood.
Disclaimer: We highly recommend you account for the drainage when leveling the soil. You do that by simply adding a slope of 1/4 inch per foot when excavating the ground.
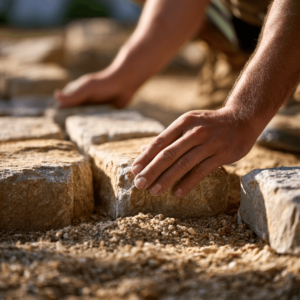
Step 04: Lay the Pavers
Once you’re done pouring and leveling the sand around the area, it is time to learn how to lay pavers on dirt. Always start by laying pavers close to a “hard edge”, like a wall, and start from there.
You can use the edge restraints before or after installing the pavers, it is up to you. But if you don’t have a hard edge to start with, you can put an edge restrain into place and start from there.
Make sure to level your pavers along the way using the level and the 2×4.
Step 05: Filling Sand
Once you’re done placing the pavers, you need to add polymeric sand on top of the finished patio and sweep it to fill the grout lines. That will keep the pavers secured in place and prevent any wobbliness.
After sweeping the sand, you’re done with your project and got yourself a good temporary paver installation.
How to lay pavers on dirt: leave it to professionals
While good enough for two or three months, this temporary installation is not meant to endure. A proper paver installation can last for years and years, especially if the installation in question is done by a professional.
If you value quality over easiness, never skip on calling professionals to help you with your landscape projects – the investment is well worth it!
If you happen to be around Sarasota, FL, your best bet is JS Brick. Our company has more than 20 years of experience with the installation and maintenance of pavers and bricks. Give us a call right now at +1 941 586 9140 for a free estimate on your project.